
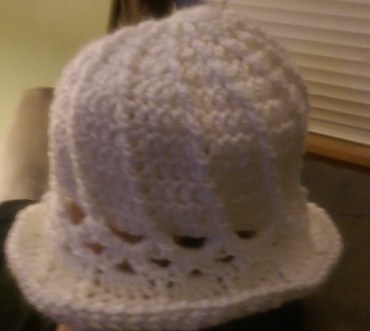
A dear friend of mine asked for a garden hat for her little girl for Easter. I immediately sprung to Pintrest to find a pattern that would work. Problem was, all the patterns were measuring much bigger than the measurements for her head.
I found the cutest pattern at My Little City Girl – Garden Party. Crochet Hat Free pattern for Kids & Adult. The direct link for the PDF can be found here. I had to modify it slightly by removing some rows, so I’m posting my pattern down below.
Note: Using the pattern below will produce a hat slightly smaller than an infant size.
For this project I used:
Size I/9 (5.5mm) crochet hook
Caron® Simply Soft Yarn – White (choose a weight appropriate for your gauge)
Yarn needle (to weave in the ends)
ABBREVIATIONS:
beg – beginning
Beg 2-dc cluster – work (ch 3, dc) together
FP – front post
ch – chain
hdc – half double crochet
dc – double crochet
mc – magic circle
rep – repeat
rnd – round
sc – single crochet
sk – skip
sl st – slip stitch
Pattern:
Start with mc (4) or ch 4 and join with sl st to create a ring.
Rnd 1: ch 3 (counts as first dc here and throughout),
work 11 more dc in ring, join with sl st in top of beg
ch-3 = 12 dc.
Rnd 2: ch 3, FPdc around same dc as join (increase
made), [dc in next dc, FPdc around same dc (increase
made)] around, join with sl st in top of beg ch-3 = 24 dc.
Rnd 3: ch 3, dc in next st, FPdc around same FPdc, [dc in
next 2 dc, FPdc around same FPdc] around, join with sl st
in top of beg ch-3 = 36 dc.
Rnd 4: ch 3, dc in next 2 sts, FPdc around same FPdc,
[dc in next 3 dc, FPdc around same FPdc] around, join
with sl st in top of beg ch-3 = 48 dc.
Rnd 5: ch 3, dc in next 3 sts, FPdc around same FPdc,
[dc in next 4 dc, FPdc around same FPdc] around, join
with sl st in top of beg ch-3 = 60 dc.
Rnd 6: ch 3, dc in next 4 sts, FPdc around same FPdc,
[dc in next 5 dc, FPdc around same FPdc] around, join
with sl st in top of beg ch-3 = 72 dc.
Rnd 7: ch 3, dc in next 5 sts, FPdc around same FPdc,
[dc in next 6 dc, FPdc around same FPdc] around, join
with sl st in top of beg ch-3 = 84 dc.
Rnd 8: ch 3, dc in next 6 sts, FPdc around same FPdc,
[dc in next 7 dc, FPdc around same FPdc] around, join
with sl st in top of beg ch-3 = 96 dc.
Rnds 9 – 11: ch 3, dc in next 6 dc, FPdc around next
FPdc, [dc in next 7 dc, FPdc around next FPdc] around,
join with sl st in top of beg ch-3.
Rnd 12: Beg 2-dc cluster, sk next 3 dc, ch 1, (2-dc cluster,
ch 3, 2-dc cluster) in next dc, ch 1, [(2-dc cluster, ch
3, 2-dc cluster) in next FPdc, sk next 3 dc, ch 1, (2-dc
cluster, ch 3, 2-dc cluster) in next dc, ch 1] around, 2-dc
cluster in last FPdc, ch 3, join with sl st in top of beg
ch-3.
Rnd 13: (beg 2-dc cluster, ch 3, 2-dc cluster) in 1st ch-1
sp), [ch 1, (2-dc cluster, ch 3, 2-dc cluster) in next ch-1
sp] around, join with sl st in beg 2-dc cluster.
Rnd 14: ch 3, 4 dc in 1st ch-3 sp, [dc in next ch-1 sp, 5 dc
in next ch-3 sp,] around, dc in last st, join with sl st in
top of beg ch-3.
Rnd 15: ch 3, dc in next 10 dc, FPdc around next dc, [dc
in next 11 dc, FPdc around next dc] around, join with sl
st in top of beg ch-3.
Rnds 16-17: ch 3, dc in next 10 dc, FPdc around next
FPdc, [dc in next 11 dc, FPdc around next FPdc] around,
join with sl st in top of beg ch-3.
Rnd 18: Working from left to right, ch 1, reverse (crab)
sc in each st around, join with sl st to beg ch. Fasten off.
Use the yarn needle to weave in any loose yarn ends.
As you can see, it fit her perfectly!
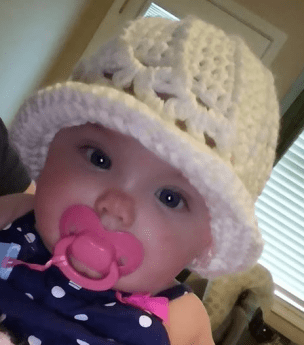
Hope yours fits just as snug. Happy crafting!
